“Undoing” an SVN revision

This is the second in a series of posts I began this summer and didn’t have time to finish.

Edit 2011/01/17: I finally noticed and fixed a small glitch in the raw command line I was using, probably caused by my use of “<>” in the example text. Sorry, folks.

We all know how it feels, right? You’ve been coding away happily, decide it’s time to push everything to your version control system of choice, type out a brilliant commit message, and hit Enter–only to find out five seconds later that you just committed something you shouldn’t have committed and everyone else is in trouble when they happen to update. What do you do now?

Well, if you have a decent version control system (VCS) such as Mercurial or Git, you take advantage of the built-in undo or undo-like command and simply undo your commit. Most modern distributed VCS’s have one, giving you at least one chance to fix your work before you hand it out for everyone else to use. However, some less-than-fun VCS’s make it difficult (mostly because they’re designed to keep the information you give them forever, warts and all, which is not a bad thing). However, it’s still usually possible to fake an undo.

Take Subversion, for example. It’s not my favorite VCS for reasons I may go into later, but it’s still a very solid one if you like and/or need the centralized type of thing. I used it a lot this summer while doing an internship with Sentry Data Systems, and I found myself needing to rollback a commit on some files a time or two. So, I did some research.

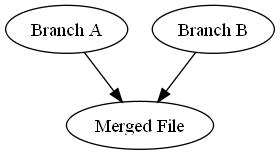
Graphical representation of a merge

Arguably the best way to rollback a commit in Subversion is to perform what they call a reverse-merge. In a normal merge, you take two versions of a file, compare them to figure out what’s different between them, and then create a new file containing the consensus content of both files (see picture to the right).

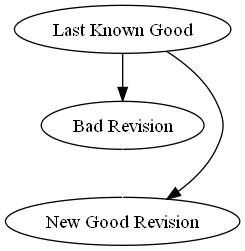
Graphical representation of a reverse merge

In a reverse-merge, you figure out what changes were made in a given revision, and then commit a new revision that reverts all of those changes back to the version before you committed your bad revision (see picture to the right), which means your bad revision will be simply skipped over as far as your comrades are concerned. Subversion provides a simple series of commands for this:

svn merge -c -{bad revision number} [{files to revert}]

Here’s how it works.

  1. The svn merge portion of the command basically tells Subversion you want to merge something. svn is the command-line tool to interact with a Subversion repository, and merge…well, you get the idea.
  2. -c -{bad revision number} tells Subversion that we want to work with the changes related to the revision numbered {bad revision number}. In this case, since we’re passing in a negative sign in front, we’re saying we want to remove those changes from the working directory. If you left out that negative sign, you’d actually pull the changes from that revision into the current working directory, which is usually only useful if you’re cherry-picking across branches. Whether that’s a good idea or not is left to the reader.
  3. [{files to revert}] are an optional list of files to undo changes in. Basically, if you pass in a list of files here, only those files will have their changes from revision–any other files changed in that revision will not be affected.

That’s pretty much it. Once you run that command (assuming there are no conflicts in your merge), you will be able to simply commit (with a helpful commit message, of course) and everything will be back to normal–your comrades in arms will be able to keep working without the overhead of your bad commit cluttering up their working environment, which is always a good thing.
Tar Pipe

This is the first in a series of posts I began this summer and only now have time to finish.

Every once in a while, I find myself needing to copy a large number of files from one Linux machine to another, ideally as fast as possible.  There are a lot of ways to do this, but the most common method usually goes something like this:

  • Tar everything up (with some form of compression if your network connection is slow).
  • (S)FTP/SCP  the file to the new server.
  • Move the file to the new location, making directories as needed.
  • Extract the tar file into the new directory.

This is all well and good, and it tends to work well in most cases–it’s just kind of laborious.  I prefer a simpler method that basically wraps everything up into a single step, affectionately known as a tar pipe.  The (admittedly somewhat complex) command follows.

  SRCDIR=  # fill in with your source directory
  DESTDIR= # fill in with your destination directory--note that your
           # uploaded directory will appear inside this one
  USER=    # fill in the your remote user name
  HOST=    # fill in with your remote host name
  tar -cvzf - $SRCDIR | ssh $USER@$HOST "mkdir -p $DESTDIR; tar -xz -C $DESTDIR

The variables are just to make things a little more easy to read (feel free to ignore them if you like), and I do recommend using a full path for the DESTDIR directory, but the basic process is ridiculously easy.  Here’s the breakdown on how the whole thing works.

  1. The tar -cvzf - $SRCDIR very obviously tars everything up, just like you normally would.  The key difference from the normal tar procedure is the fact that the “file” you’re creating with tar is actually sent to stdout (by the -f - option) instead of being written to the file system.  We’ll see why later.
  2. The | (pipe) passes everything on stdout on as stdin for the next command, just like normal.
  3. The ssh command is the fun part.
    1. We start an ssh session with $HOST as $USER.
    2. Once that’s established, we run two commands.
      1. mkdir -p $DESTDIR to make the destination directory, if needed.
      2. tar -xz -C $DESTDIR to untar something. What, we’re not sure yet.

What it untars is a bit of a mystery, as we don’t really tell it what it’s supposed to work on.  Or do we?  As it turns out, ssh passes whatever it receives on stdin on to the command it runs on the server.  I.e., all that stuff we just tar’red up gets passed along through the magic of piping from the local machine to the remote machine, then extracted on the fly once it gets to that machine.

You can see the benefit of this, I trust–instead of that whole four command process we detailed above, including manually logging into the remote server to actually extract the new file, we have one fairly simple command that handles taring, uploading, and extracting for us, with the added benefit of not requiring us to actually create any files we don’t have to create.  That’s kind of cool, right?

Note:  I’ve seen other implementations of the tar pipe, but this is the one I’ve used been using recently.  It’s worked for me on Red Hat 5, but your mileage may vary.

Linux Screen Command

Normally, when you log into a remote server via SSH, you get one command prompt and so there’s essentially only one thing you can do at a time without a lot of extra hassle.  However, most of the time I (and presumably others like me) need to do lots of things, potentially in different directories spread out all over the place.  Since switching back and forth between directories all the time is only one of those hassles I mentioned, more often than not I end up with multiple SSH connections to the same server.

Like a couple days ago–I had a connection open to edit my files, one to handle my version control (Mercurial, if you’re curious–more on that later), and one to keep tabs on my data.  Juggling multiple connections like that is easy in a GUI–a couple of quick “Alt-Tabs” and you’ve gone from your editor to your data directory to your version control and back again.  However, all those connections can eat up your bandwidth and many other less-than-fun things, especially when there’s a handy little tool around to do the same kind of thing built right in to the Linux (and presumably other Unix-like OS’s)–the screen command.

The screen command essentially allows you to create multiple “windows” or “screens” you can use within the same connection.  You get multiple command prompts you can work with, and a handy keyboard shortcut similar to but slightly less convenient than “Alt-Tab” to switch between your “screens”.  Another benefit to using screen is that your sessions can survive across SSH sessions–you can disconnect from your screen, log off the server, go away to do something more fun for a couple hours, log back in, and resume right where you left off–same environmental variables, same directory, same command history, etc.  You can even use screen to run long-running commands (say, a command that takes hours or days to run) without having to stay logged in the whole time.  Pretty cool, huh?

You can get most of the information you need to use the screen command effectively out of the man page (this one’s not bad), but I’ll summarize the pieces I find most useful here.

First off, you need to create a new screen, ideally with a name, so you can resume them more easily later and not have to remember a weird id number.  To make a screen named “screenTest” for example, run the following command:

     screen -S screenTest

You should be switched over to a new command prompt and see something like “[screen 0: bash]” in your SSH session’s title, assuming your SSH client supports that kind of change.

The next thing you need to know is how to create what I call a “subscreen,” though I don’t think that’s an official term.  (I’d run a simple command like “ls” now so you can tell the difference between your “subscreens.”)  Hit CTRL+A, release them both, and hit C.  Once again, you should see a new command prompt and something like “[screen 1: bash]” in your window’s title.  Switch back and forth between your “subscreens” by hitting CTRL+A twice just to see that you can, or until you’re convinced there’s a difference between the two.  If you have more than two subscreens, you need to know about a couple more things about subscreen navigation:

  1. CTRL+A twice navigates to the most recently used subscreen.
  2. CTRL+A, N navigates to the “next” subscreen in your list of subscreens.
  3. CTRL+A, P navigates to the “previous” subscreen in your list.
  4. CTRL+A, 0 navigates to the screen numbered 0.  You can use any number between 0-9 for the same effect.
  5. CTRL+A, ” opens up a list of the screens you can move between.
  6. CTRL+A, ‘ prompts you for a screen number and allows you to bounce straight to that screen.

Now, it’s time to drop out of your screens as if you were going to log out.  Hit CTRL+A followed by D, and you should be “detached” from your current screen.  You’ll have returned to your original command prompt, with a little “[detached]” message right after your screen command.

Let’s pretend you wandered away from your computer and came back, ready to start work again.  You need to resume your previous session, so run this command.

     screen -r screenTest

Voilà!  Your screen should open up, just like it was when you detached from it earlier (unless you were running a long command, in which case the output is probably different, but that’s beside the point).  Having fun yet?

One more thing that you might need to know is how to connect to a screen that’s already attached somewhere else, or that didn’t get detached properly somehow (I’ve had it happen once or twice).  This one’s pretty obvious, as well.

     screen -d screenTest

If you pass the “-r” flag to that command, as well, you will detach the other session and connect to it yourself, which can be helpful if you’re moving between computers or something like that.

When it’s time to nuke a screen completely (like if you were a smart person and set up separate screens for each project you’re working on, and just finished one of them), getting rid of it is really easy.  Attach to it, and hit CTRL+D until you close out all of the subscreens.  Be careful you don’t nuke your real session, though, because it’s really easy to do.

One caveat–if you use screen a lot, get used to piping things through less, since the scroll bar of your window will do strange things while you’re running screen.

Ok, that takes care of the basics.  Have fun!